학습목표: FileInfo Class를 사용하여, File의 속성을 캐치하고,

현재 날짜를 기준으로 D-Day를 설정하여 파일을 지운다.


// FileInfo를 사용하기 위한 using..

using System.IO;


<key poing = 날자 계산은 일수로 모두 변환하여 하였다.>


private void DeleteDDay(int mode, int dday)
{
int TodayYear = DateTime.Now.Year;
int TodayMonth = DateTime.Now.Month;
int Today = DateTime.Now.Day;
int TodayTotalday = (TodayYear * 365) + (TodayMonth * 30) + (Today);
string TargetPath;
//1 = Device Log,
if(mode == 1)
TargetPath = RegStruct.uLocalDeviceLog;
// 2 = Handler Log
else if(mode == 2)
TargetPath= RegStruct.uLocalHandlerLog;
// 3 = Delete Function
else
TargetPath = "";


string[] GetFiles = Directory.GetFiles(TargetPath, "*.rtf", SearchOption.TopDirectoryOnly);
foreach (string strFileName in GetFiles)
{
FileInfo aFile = new FileInfo(strFileName);
int tYear = aFile.LastWriteTime.Year;
int tMonth = aFile.LastWriteTime.Month;
int tDay = aFile.LastWriteTime.Day;
int tTotalday = (tYear * 365) + (tMonth * 30) + (tDay);

if ((TodayTotalday - tTotalday) > dday)
aFile.Delete();
}
}


'프로그래밍 > .Net' 카테고리의 다른 글

string Format 이어서 사용하기  (0) 2014.01.17
Control Location 사용법 알아보자  (0) 2014.01.17
SourceGrid2 사용하기 모든것  (0) 2014.01.17
Tab Control index change  (0) 2014.01.17
textbox 글자넣기  (0) 2014.01.17

grid에 데이터 넣기


private void SetChkStatusGrid()
{
string[] ChkStatusName = new string[]{"Seq.1) BarCode Scanner Check...",
"Seq.2) MES SERVER Connection Check...",
"Seq.3) MES_NET file Execute Check...",
"Seq.4) LOT ID FILE Search...",
"Seq.5) LOT ID FILE Downloading..."};

string strName = "";
int HeaderCnt = 2, ColumnCnt = 6;
gridChkStatus.BorderStyle = BorderStyle.FixedSingle;
gridChkStatus.BackColor = Color.Black;
gridChkStatus.Redim(ColumnCnt, HeaderCnt);
for (int row = 0; row < ColumnCnt; row++)
{
for (int col = 0; col < HeaderCnt; col++)
{
if (row == 0)
{
if(col == 0) strName = "CHECK PROCESS.....";
else strName = "PASS/FAIL";
gridChkStatus[row, col] = new SourceGrid2.Cells.Real.ColumnHeader(strName);
m_ChkStsHeaderColor.TextAlignment = ContentAlignment.MiddleCenter;
gridChkStatus[row, col].VisualModel = m_ChkStsHeaderColor;
}
else
{
if (col != 0){
gridChkStatus[row, col] = new SourceGrid2.Cells.Real.Cell();
}
else {
gridChkStatus[row, col] = new SourceGrid2.Cells.Real.Cell(ChkStatusName[row - 1]);
}
gridChkStatus[row, col].VisualModel = m_ChkStsBackColor;
}
}// for int col
} // for int row

// gridChkStatus[1, 1] = new SourceGrid2.Clls.Real.Cell("only test");
gridChkStatus.AutoSizeAll();
}

색 및 정렬하기

private SourceGrid2.VisualModels.Common m_ChkStsPColor;
private SourceGrid2.VisualModels.Common m_ChkStsFColor;
private SourceGrid2.VisualModels.Common m_ChkStsBackColor;
private SourceGrid2.VisualModels.Common m_ChkStsHeaderColor;

public LotIDScanForm(RegistryStruct MainRegStruct)
{
..................

m_ChkStsPColor = new SourceGrid2.VisualModels.Common();
m_ChkStsFColor = new SourceGrid2.VisualModels.Common();
m_ChkStsBackColor = new SourceGrid2.VisualModels.Common();
m_ChkStsHeaderColor = new SourceGrid2.VisualModels.Common();

// Chk Status를 위한 Color 생성.
m_ChkStsPColor.BackColor = Color.Green;
m_ChkStsFColor.BackColor = Color.OrangeRed;
m_ChkStsBackColor.BackColor = Color.AliceBlue;
m_ChkStsHeaderColor.BackColor = Color.Khaki;

// 문자열 정렬.
m_ChkStsPColor.TextAlignment = ContentAlignment.MiddleCenter;
m_ChkStsFColor.TextAlignment = ContentAlignment.MiddleCenter;
m_ChkStsBackColor.TextAlignment = ContentAlignment.MiddleCenter;
m_ChkStsHeaderColor.TextAlignment = ContentAlignment.MiddleCenter;


학습목표: Tab Index가 변경될때, 그 index 번호를 알아내자.


enum TabStatus : int { SLogin = 0, ScanGpib = 1, UI = 2, LotEnd = 3 }


private void TabCtrlfunctionSetup_SelectedIndexChanged(object sender, EventArgs e)
{
TabControl tab = (TabControl)sender;
if (tab.SelectedIndex == (int)TabStatus.ScanGpib)
txtboxScanData.Focus();
}


txtboxScanDataList. AppendText(sBuf);

학습목표: 이번 장에서는 KeyPress를 활용하여,

특정 Key가 눌러졌을때 그에 상응하는 대응 코드를 작성해 보자.


//하기와 같이 KeyPress Event를 활용하면 된다.

끝..


private void txtboxScanData_KeyPress(object sender, KeyPressEventArgs e)
{
if (e.KeyChar == (int)Keys.Enter)
{
string sBuf = txtboxScanData.Text;
MessageBox.Show(sBuf);
}
}

'프로그래밍 > .Net' 카테고리의 다른 글

Tab Control index change  (0) 2014.01.17
textbox 글자넣기  (0) 2014.01.17
Color class에서 문자열로 색 지정하기  (0) 2014.01.17
MainForm, ChildForm 데이터 공유  (0) 2014.01.17
Color Type(Color.)  (0) 2014.01.17

학습목표: Color Class를 사용함에 있어,

TextBox Control의 BackColor에 색을 지정하고 싶은 경우, 문자열로 지정된 값을 색을 넣어보자


이 얼마나 쉬운가~!!

1. TextBox.BackColor = Color.FromName("Red");

학습 목표: Main Form을 생성한 후, MainForm에서 SubForm을 생성하여,

RegistryStruct class내에 선언된 변수에 데이터 저장 후

SubForm을 닫고 Main Form에서 RegistryStruct Class의 변수값을 사용하여보자.


1. Main Form 전역으로 RegistryStruct 선언하고,

실제 SubForm을 사용하는 곳에서 SubForm을 생성시킨다.


RegistryStruct RegStruct = new RegistryStruct();


private void btnFuncSetup_Click(object sender, EventArgs e)
{

// MainForm과의 데이터 공유를 위하여 매개변수에 RegStruct를 넘겨준다.
SubForm = new SubForm (RegStruct);
funcDlg.Show();
}


2. SubForm 생성자에서 해당 구조체를 받아서 데이터를 Read/Write 수행한다.

// 전연변수로 선언. new로 선언하면 새로운 인스턴트가 생성되어버림.

RegistryStruct RegStruct;


// Sub Form 생성부분에서 Main Form의 데이터를 받는다.

public FunctionSetupDlg(RegistryStruct MainRegStruct)
{
InitializeComponent();

// Main form에서 생성을 먼저 하고, Sub Form으로 연결시킨다.
this.RegStruct = MainRegStruct;

}


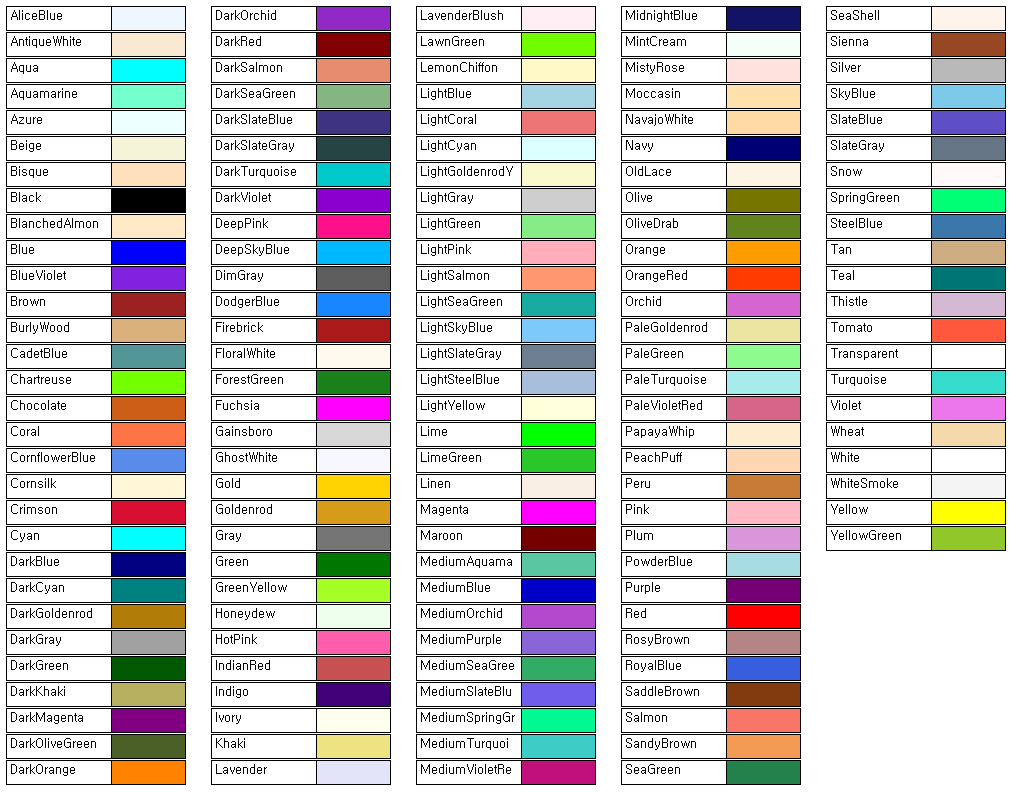
Color의 속성으로 설정할 수 있는 Color name..


//파일조작 - 생성 삭제 복사 이동
string path = @"sample.txt";
FileInfo file = new FileInfo(path);

if (file.Exists) // 파일이 있는지
{
// 복사 (경로,덮어쓰기 옵션 기본값 false)
// 만약 덮어쓰기 false일때 파일이 존재하면 에러남.
file.CopyTo(@"sample2.txt",true);
file.CopyTo(@"sample3.txt", true);

// 이동
FileInfo fileMove = new FileInfo(@"sample2.txt");
fileMove.MoveTo(@"sample2.txt");
if (fileMove.Exists) // 파일이 있는지
{
fileMove.MoveTo((@"c:\sample2_move.txt")); // 이미있으면 에러
}

// 삭제 - 먼저 삭제할 파일을 FileInfo로 연다.
FileInfo fileDel = new FileInfo(@"c:\sample2_move.txt");
if (fileDel.Exists) // 삭제할 파일이 있는지
{
fileDel.Delete(); // 없어도 에러안남
}

// 이름 바꾸기
FileInfo fileRename = new FileInfo(@"sample3.txt");
if (fileRename.Exists)
{
fileRename.MoveTo(@"sample3_rename.txt"); // 이미있으면 에러
}
}


파일 조작 복사.

if (bSimMode == true)

{

FileInfo file = new FileInfo(sourcefile);

if (file.Exists != true)

{

MessageBox.Show(" ";

return true;

}


file.CopyTo(localfile, true);


return true;

}


학습목표: 자신의 Local PC의 IP를 얻어오는 연습을 해보자.


// 자신의 PC의 IP를 얻어와 default로 설정한다.
IPAddress ipadrs = Dns.GetHostEntry(Dns.GetHostName()).AddressList[0];
string strCurIP = ipadrs.ToString();


의외로 간단하다.

끝~!

+ Recent posts